Building Your First Base dApp in 2026: Complete Hands-On Guide
This guide walks you through building, testing, and deploying a minimal but fully on-chain dApp on Base in 2026. You will go from a blank folder to a live contract on Base mainnet, with a simple UI that anyone can interact with.
1. What You’ll Achieve
By the end, you will have:
- A wallet correctly configured for Base mainnet
- ETH bridged to Base using the official bridge
- A simple Solidity contract deployed on Base
- A minimal frontend that reads and writes on-chain state on Base
- A checklist for safe, low-cost deployments on Base going forward
If we can walk through this end-to-end in one guide, you can absolutely ship your first Base dApp. The first deployment always feels hardest; after that, it becomes muscle memory.
2. Why Building on Base in 2026 Matters
Base is Coinbase’s Ethereum Layer 2 (L2) built on the OP Stack, optimized for high-throughput, low-cost dApps. As of early 2026, on-chain data from DeFiLlama, Dune, and BaseScan shows:
- ~$2.8B in Total Value Locked (TVL), growing about 15% month over month
- ~450,000 daily active addresses and ~1.2M transactions per day
- Average transaction fees in the ~$0.001-$0.005 range for simple interactions
This combination-Ethereum security, Coinbase distribution, and ultra-low fees-makes Base one of the most practical chains for consumer dApps in 2026. The catch: Base currently relies on a centralized sequencer run by Coinbase. That’s fine for many apps, but you should understand that liveness and censorship resistance depend on a single operator.
Your first dApp is how you get hands-on with these tradeoffs, rather than just reading dashboards.
3. Prerequisites
You do not need to be a Solidity expert, but you should be comfortable with basic JavaScript and the command line.
- Wallet: MetaMask or Coinbase Wallet (browser extension)
- Development tools:
- Node.js 18+ and
npmorpnpm - Git installed
- A code editor (VS Code recommended)
- Node.js 18+ and
- On-chain requirements:
- Some ETH on Ethereum mainnet (for bridging)
- Willingness to spend a few dollars on gas (most Base txs are fractions of a cent, but the mainnet bridge tx runs on L1 Ethereum)
- Basic concepts to know:
- What a smart contract is
- How a wallet signs transactions
- Very basic familiarity with Hardhat, Foundry, or Remix (we’ll use Hardhat here)
Once you get past the initial wallet and network setup, the rest of the process is surprisingly straightforward.
4. Step-by-Step: Build, Test, and Deploy on Base
Step 1 – Add Base Mainnet to Your Wallet
This is where many people stumble: they deploy or bridge to the wrong network. Lock this in correctly and you avoid hours of confusion.
- Open MetaMask (or Coinbase Wallet) in your browser.
- Open the networks menu and choose
Add network→Add a network manually.
Use these exact parameters for Base mainnet:
- Network Name: Base
- RPC URL:
https://mainnet.base.org - Chain ID:
8453 - Currency Symbol:
ETH - Block Explorer:
https://basescan.org
Switch your wallet to the new Base network and keep it there for now.
Step 2 – Bridge ETH to Base Using the Official Bridge
Without ETH on Base, you cannot pay gas or interact with your dApp. The official bridge is the safest starting point.
- In your wallet, switch back to Ethereum Mainnet.
- Visit the official bridge: https://bridge.base.org.
Security check: Manually type the URL or use a trusted bookmark; bridge phishing sites are common. - Connect your wallet.
- Set:
- From: Ethereum
- To: Base
- Enter an amount of ETH to bridge, for example
0.02ETH:- ~0.005–0.01 ETH is plenty for dozens of test transactions on Base.
- Leave some ETH on L1 for the bridge gas fee.
- Confirm the transaction in your wallet.
Timing & cost: The bridge transaction itself runs on Ethereum mainnet, so gas can be a few dollars depending on L1 congestion. The transfer typically finalizes in a few minutes, but optimistic rollup security windows mean withdrawals in the opposite direction (Base → Ethereum) can take days. For deposits, expect ~5–20 minutes before you see the ETH on Base.
Once complete, switch your wallet back to the Base network and confirm that your ETH balance now shows on Base.
Step 3 – Initialize a Hardhat Project
Now you’ll set up the development environment for your contract and scripts.
- Create a new folder for your project and move into it:
mkdir base-onchain-notes && cd base-onchain-notes
- Initialize a Node project:
npm init -y
- Install Hardhat and tooling:
npm install --save-dev hardhat @nomicfoundation/hardhat-toolbox dotenv
- Run Hardhat’s wizard:
npx hardhat→ chooseCreate a JavaScript project, accept defaults.
You should now have a basic Hardhat structure with contracts, scripts, and hardhat.config.js.
Step 4 – Write a Simple Fully On-Chain Contract
We’ll build a minimal “on-chain notes” contract: anyone can write a short message, and the latest message is stored entirely on Base. In practice, you’d want more structure, but this is perfect to learn the full pipeline.
Create a new file contracts/OnchainNote.sol and paste:
// SPDX-License-Identifier: MIT
pragma solidity ^0.8.20;

contract OnchainNote {
    string public latestNote;
    address public author;
    uint256 public updatedAt;

    event NoteUpdated(address indexed author, string note, uint256 timestamp);

    function setNote(string calldata _note) external {
        // Simple guard: avoid extremely long strings that waste gas
        require(bytes(_note).length <= 280, "Note too long");

        latestNote = _note;
        author = msg.sender;
        updatedAt = block.timestamp;

        emit NoteUpdated(msg.sender, _note, block.timestamp);
    }
}
Why this design?
- Everything (text, author, timestamp) lives directly on Base, with no off-chain database.
- We cap the note length to avoid users accidentally storing huge strings and paying high gas.
- The
NoteUpdatedevent makes it easy for a future indexer (like The Graph) to track updates.
Step 5 – Configure Hardhat for Base Mainnet
This next step is where most users fail-by hardcoding private keys or misconfiguring RPC URLs. We’ll do it the safe way.
- Create a
.envfile in your project root (and add it to.gitignore):PRIVATE_KEY=your_hex_private_key_without_0xBASE_RPC_URL=https://mainnet.base.org
- Open
hardhat.config.jsand update it like this:
require("@nomicfoundation/hardhat-toolbox");
require("dotenv").config();

const { PRIVATE_KEY, BASE_RPC_URL } = process.env;

module.exports = {
  solidity: "0.8.20",
  networks: {
    base: {
      url: BASE_RPC_URL || "https://mainnet.base.org",
      accounts: PRIVATE_KEY ? [ "0x" + PRIVATE_KEY ] : [],
      chainId: 8453,
    },
  },
  etherscan: {
    // Optional: configure later for contract verification on BaseScan
    apiKey: {
      base: "YOUR_BASESCAN_API_KEY"
    },
  },
};
Security note: never commit your private key or .env file to Git. Treat this key like real money—because it is.
What about testnets? In real workflows, you’d add Base’s public testnet (Base Sepolia) here as well and deploy there first. The RPC URL and chain ID sometimes change as networks evolve, so always copy them from the official docs at https://docs.base.org before adding a testnet network.
Step 6 – Deploy Your Contract to Base
Once you get to deployment the first time, you’ll realize how simple subsequent deployments really are.
- Create a deploy script at
scripts/deploy.js:
async function main() {
  const OnchainNote = await ethers.getContractFactory("OnchainNote");
  const contract = await OnchainNote.deploy();
  await contract.waitForDeployment();

  const address = await contract.getAddress();
  console.log("OnchainNote deployed to:", address);
}

main()
  .then(() => process.exit(0))
  .catch((error) => {
    console.error(error);
    process.exit(1);
  });
- Compile the contract:
npx hardhat compile
- Make sure your wallet’s private key in
.envcorresponds to an address that:- Is connected to Base in your wallet
- Has some bridged ETH on Base (from Step 2)
- Deploy to Base:
npx hardhat run scripts/deploy.js --network base
You should see a console message like:
OnchainNote deployed to: 0xABC...123
Copy this address. Then visit BaseScan at https://basescan.org and paste the address into the search bar. You should see your contract, its creation transaction, and any subsequent interactions.
Gas cost: At 2026 fee levels, deploying a small contract like this on Base usually costs well under a dollar, often just a few cents. The exact cost fluctuates with both Ethereum and Base demand.
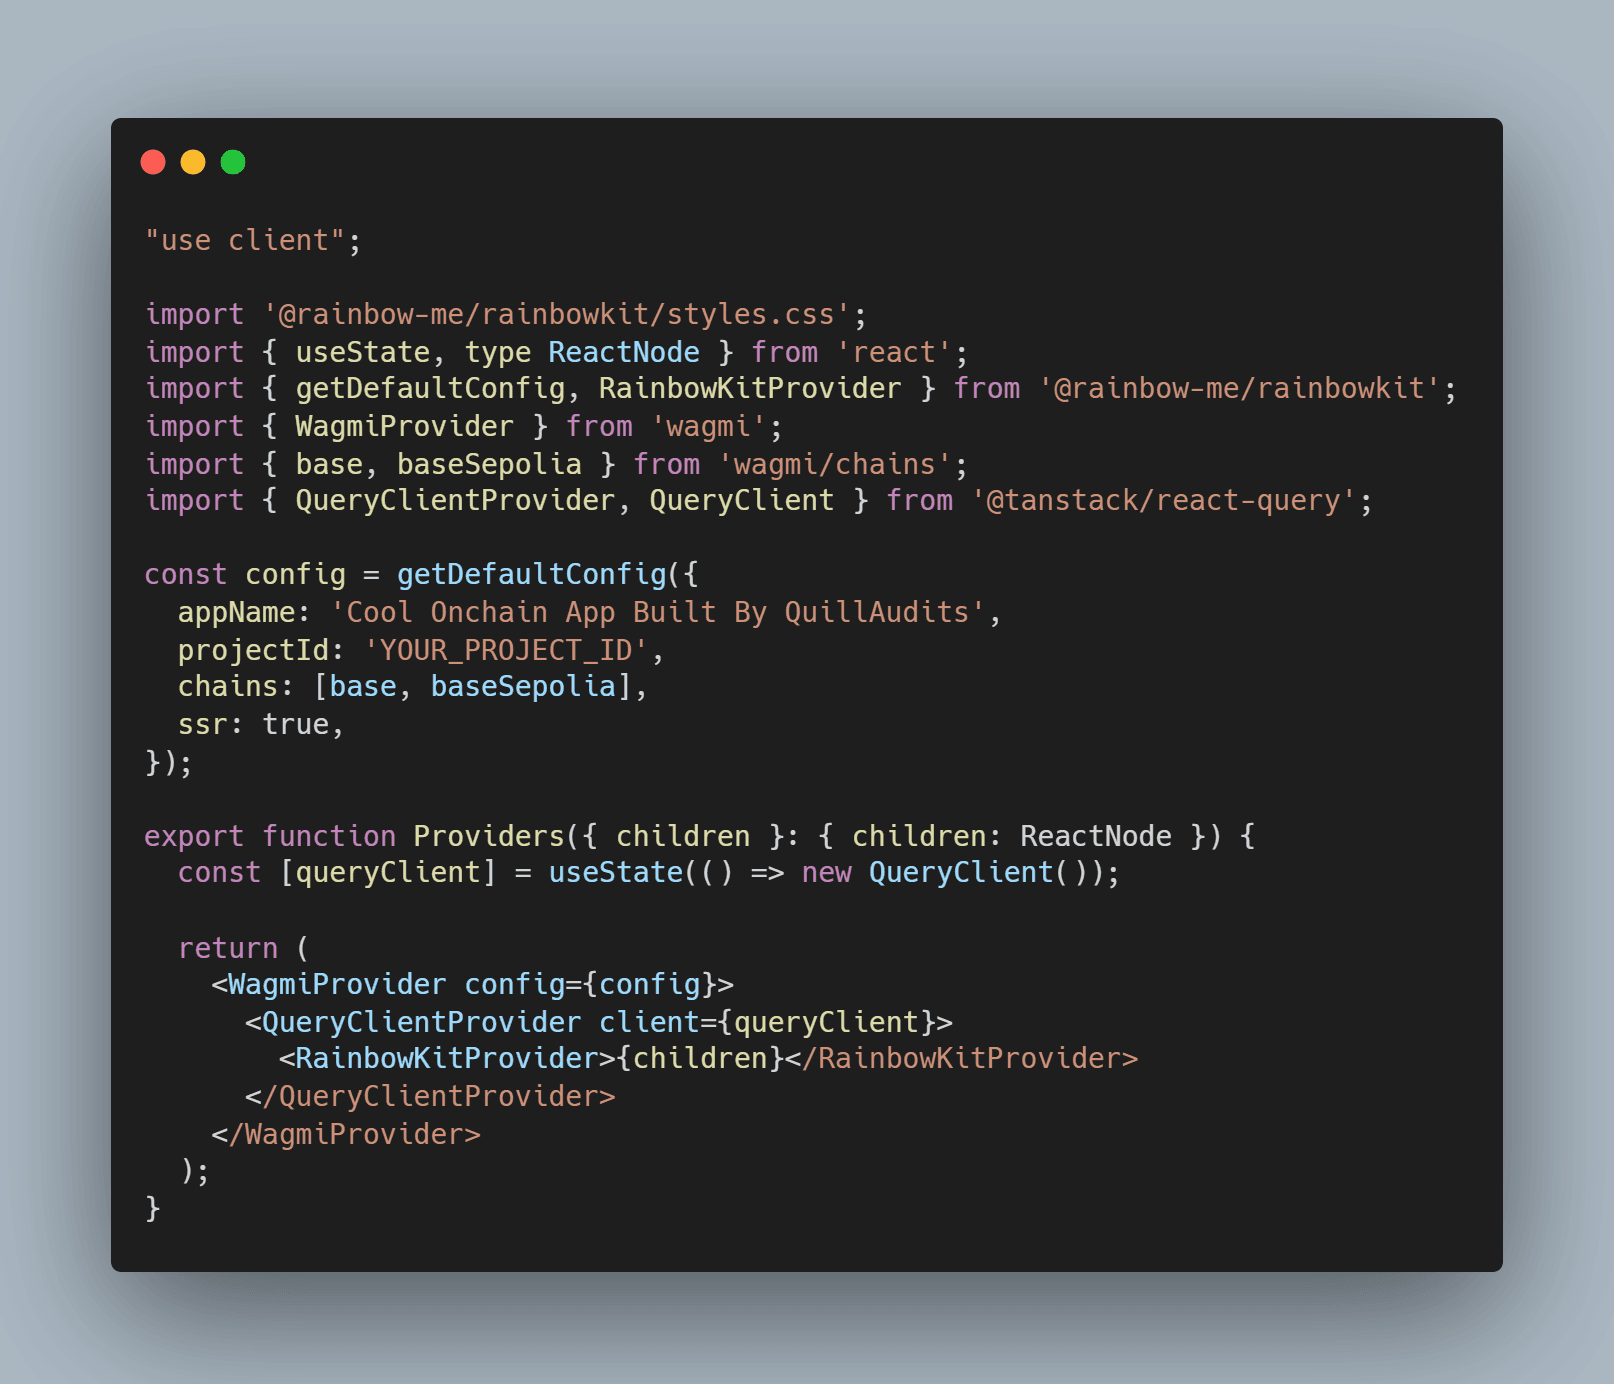
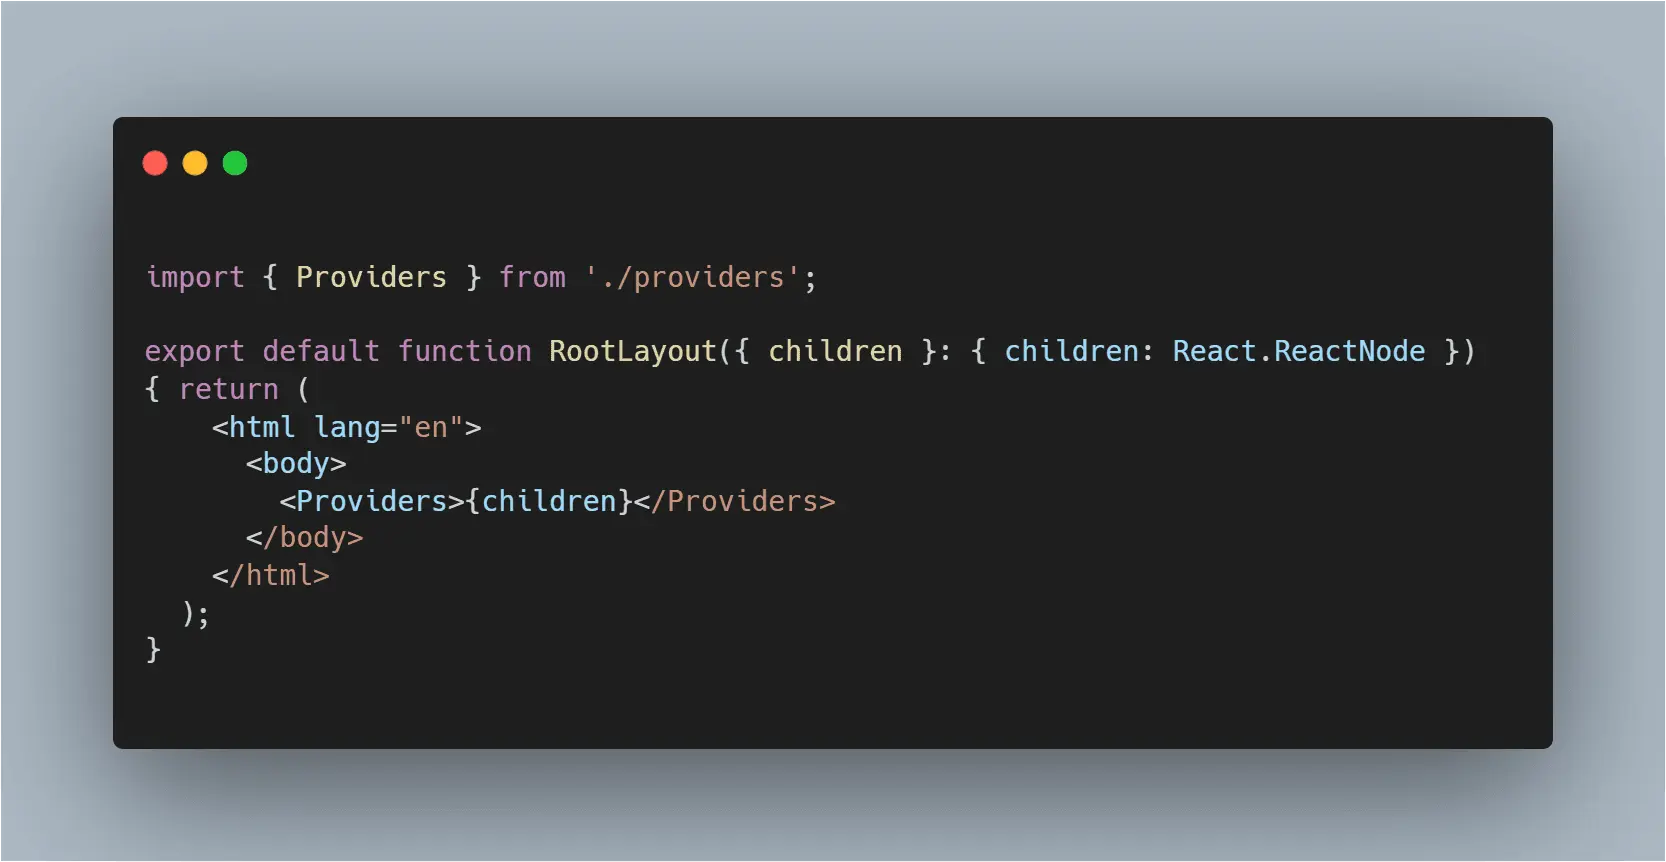
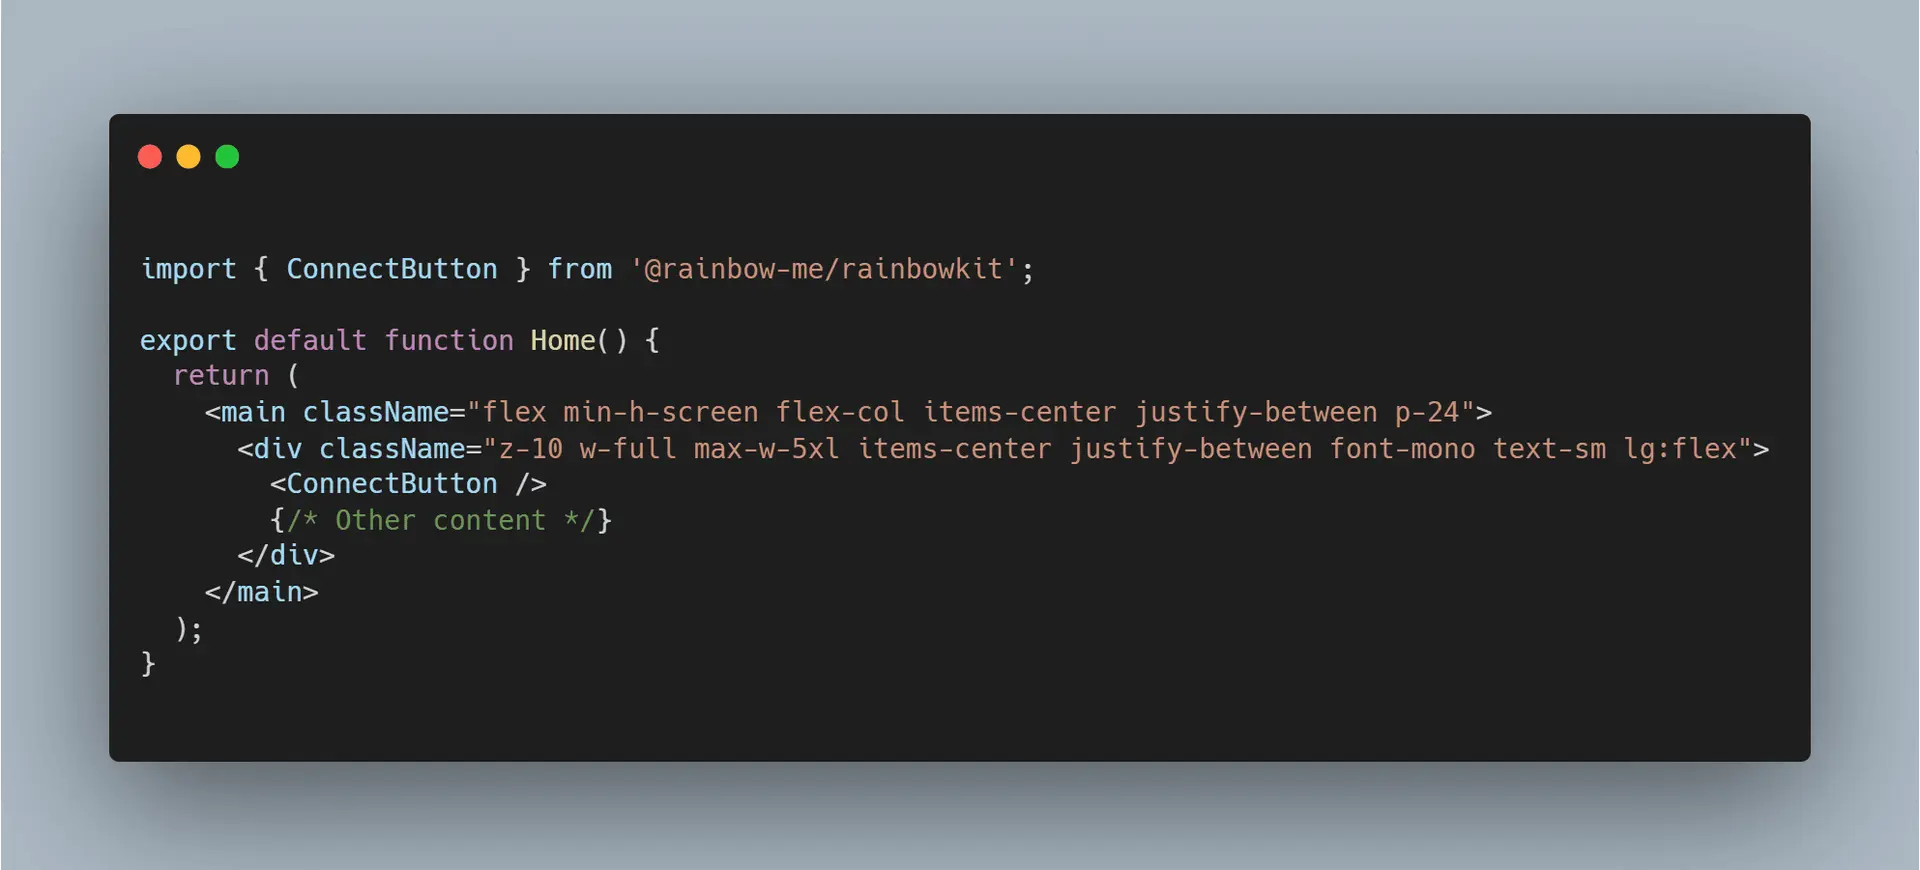
Step 7 – Build a Minimal Frontend to Call Your Contract
A simple UI lets you confirm everything works and gives you a base to expand into a real product.
- From your project root, create a basic React app (for example, using Vite or Next.js). With Vite + React:
npm create vite@latest frontend -- --template reactcd frontend && npm install
- Install web3 libraries:
npm install wagmi viem
In your frontend, you will:
- Configure
wagmito use the Base chain with RPChttps://mainnet.base.org - Set the deployed contract address from your console output
- Use the contract ABI (compiled by Hardhat in
artifacts/contracts/OnchainNote.sol/OnchainNote.json) - Create a form that calls
setNoteand a component that readslatestNoteandauthor
This part is a bit more involved, but once you successfully send a transaction from the UI and then see the updated note appear on BaseScan, you’ve completed the full loop: wallet → dApp → Base → explorer.
5. Common Issues on Base (and How to Fix Them)
Transaction Stuck or Pending Forever?
- Check the network: Make sure your wallet is on Base, not Ethereum or another L2.
- Check gas: If you sent a very low gas price (or used a custom gas setting), the transaction may be underpriced. On Base, simply using your wallet’s default gas usually works best.
- Use the explorer: Paste your wallet address into BaseScan. If your transaction shows as “Pending” for a very long time while others are finalizing, consider canceling or replacing it via your wallet’s “speed up” / “cancel” features.
Bridged ETH Not Showing Up on Base?
- Confirm you bridged to Base, not to another L2.
- Check the deposit transaction on an Ethereum explorer (like Etherscan) and verify it’s marked as successful.
- Wait at least 10–20 minutes before panicking; Base batches deposits.
- If you used a third-party bridge, check their UI for status and support links.
“Insufficient Funds for Gas” When Deploying?
- Confirm your deployer address (from
PRIVATE_KEY) is the same address that holds ETH on Base. - Remember: mainnet deployment costs more than a simple swap or contract interaction. If you only bridged a tiny amount (e.g., 0.001 ETH), bridge a bit more.
Contract Not Visible or Not Verified on BaseScan?
- Right after deployment, BaseScan might briefly show the contract as “Unknown”. This is normal.
- To verify the contract (recommended for transparency):
- Get a BaseScan API key from BaseScan.
- Configure the
etherscansection inhardhat.config.jsfor Base. - Run
npx hardhat verify --network base <your_contract_address>with constructor args if needed.
6. Pro Tips for Base dApps in 2026
- Optimize for on-chain costs early. Even though Base fees are tiny (~$0.001–$0.005 per call), bloated storage or heavy loops add up. Use smaller data types where possible and avoid unbounded loops.
- Transact when Ethereum is quiet. Your daily Base interactions are cheap, but bridging still touches L1. Bridging during off-peak hours (e.g., weekends or times of low Ethereum gas) can cut your costs significantly.
- Use testnets and local forks. Before touching mainnet:
- Test on a local Hardhat network.
- Deploy to Base testnet (Base Sepolia) using official docs and a faucet.
- Think about sequencer risk. Base’s single, Coinbase-run sequencer has been reliable, but it’s still a central point of failure. For mission-critical apps, design so that:
- Users can eventually exit funds even if the sequencer goes down.
- Contracts avoid assumptions about instant finality; consider the 7-day optimistic challenge window for L1 settlement.
- Security before features. Get a basic audit or at least a peer review before you store real value. Use tools like Slither, Echidna, or other static analyzers, and keep up with Base ecosystem security reports from firms like PeckShield or Quantstamp.
7. What’s Next After Your First Base dApp
You now have a live, fully on-chain dApp running on Base: a contract deployed, a UI wired up, and a mental model for how funds, gas, and infrastructure fit together. From here, the possibilities widen fast.
- Index your data: Use The Graph or a lightweight indexer to query
NoteUpdatedevents and build richer experiences. - Support more wallets: Integrate Coinbase smart wallets or account abstraction tooling from the Coinbase Developer Platform to onboard non-crypto-native users.
- Explore DeFi composability: Connect your dApp to existing Base protocols (DEXes, lending markets) to tap into the ~$2.8B TVL flowing through the chain.
- Track ecosystem health: Watch Base metrics on DeFiLlama, Dune, and BaseScan to see how user behavior and fees evolve as you grow.
The hardest part—getting your first contract safely deployed and wired to a UI—is behind you. From here, you can iterate: refactor your contract, add features, experiment with NFTs or DeFi primitives, and, most importantly, get real users interacting with your dApp on Base.